I’ve been working on getting Little Man’s BIG BOY room finished. It’s been such slow going, what with all of the projects I have going at any given time – not to mention life in general. ;-)
This was Little Man’s bedroom when we bought the house last January:
![IMG_4734%5B2%5D[1]](https://blogger.googleusercontent.com/img/b/R29vZ2xl/AVvXsEi6DEhCDhyIvKtPP4q6G34PN492AXrQ8it5nCUhXUa_eM8u1g1SnNbyfkCigR_ndOqrmOFz58n4WGsYjLVae_Iwhyphenhyphenv77_EatZ6g327a_B0RYuh2E1X0OIgWSOrtdKduf61JwnKMzp9yLayN/?imgmax=800 "IMG_4734%5B2%5D[1]")
We painted the walls and trim immediately but that’s about as far as we got. He was still in his crib and had my old hand me down particle board dresser.
Piece by piece, I’ve been putting his room together over the past few months. It all started with his new bed. One of T’s friends had this old trundle bed in need of a new home. She knew we were going to be putting LM in a bed soon so offered it to us.
Bed before (It’s on sawhorses waiting for a makeover):

I also got this great dresser at a yard sale:

And let’s not forget the bookshelf my dad built for him:

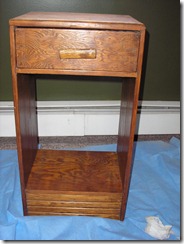
We’ve had this bedside table for years (it was most recently white and being used in Monkey’s old bedroom – I also just found out my mother-in-law built it!):
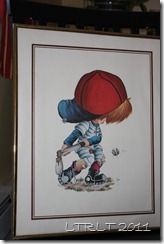
I also had this framed poster from T’s childhood bedroom:
Now we have this:

and this:

The details:
The bed is painted Chianti by Behr and outfitted with a quilt I’ve had for years and years.
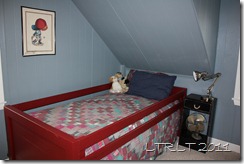
The nightstand received a 3rd makeover, getting a quick coat of Chianti and then painted with a premixed Rust-Oleum semi-gloss black. I then distressed the edges to show the layers of white and red beneath. I also used an old tow rope from camp to make a new handle.

The lamp was from KMart for $17 and the fan I picked up at a yard sale for 50 cents.

My $15 dresser didn’t need much work. It had a Formica top I ripped off. The glue required far more scraping than I could handle so I used a stripping agent to get it down to bare wood. The same Rust-Oleum semi-gloss black, some light distressing and a top coat of polycrylic and it was done. The tractor and piggy were gifts – the old rail lamp was $2.50 at an antiques store.

The bookshelf received the same treatment as the top of the dresser.

Most of our books were either gifted or from my large box of books from childhood. The trophies are a couple of T’s hockey trophies from middle school. I got the truck for $2 at an antiques store.

Lastly, we have T’s old poster. I spray painted the frame black with some random generic black paint I had on hand (I had done this at the old house and even had the poster up but I only just put it up here last week). There was a tiny bit of overspray on the inside that I could easily have wiped off but I like the added character it gives.

The total so far in his bedroom is $71.
Left to do:
-
Finish shades (he has 1 – needs a 2nd)- fabric already purchased for $15 – will also have plenty extra for throw pillows
-
T needs to put new window trim in (just replaced those windows) – not counting towards room cost as we’re doing this throughout the house
-
My grandmother has an old dresser mirror I plan to put in there
-
Random art – I have most everything here just haven’t gotten to those projects yet
I love love LOVE how his room is turning out. I love the history of the pieces and the stories they tell. I also love how rugged the pieces are – they’re very able to survive a growing boy.
The best part? I do believe the total cost will remain just around $100!
I hope you enjoyed the tour!
Linking up here:
![DIYShowOffbuttonsmall[1]](https://blogger.googleusercontent.com/img/b/R29vZ2xl/AVvXsEjmXV0c3q3ue1NP8axZe1ewg8ZxmESOtPLLNQK77o4ICedCm5lLu2v7JU8J6-8mYE5UflksHFhm__tHk-DZKdVgOvuyZU95Ut_DsOhpCbG2fm2QquxD2OigQaDfn7rxYydybhLKsMC-6hK3/?imgmax=800 "DIYShowOffbuttonsmall[1]")
![4[1]](https://blogger.googleusercontent.com/img/b/R29vZ2xl/AVvXsEi_iONSXN1Cs87orBbozzHDujLD3tOHZwl41J0rSIKsYg-n-9fDyV6xNyf9HpDdflLi_LmAdxVLz1dQaAvsC32cBF0IsrASFR4I5DNyWtETkhn0o9hf50FpyPO3qBHjGp_5zZJ94rWbS0sh/?imgmax=800 "4[1]")
Frugal Friday @ The Shabby Nest
![TipMeTuesdayButton1[1]](https://blogger.googleusercontent.com/img/b/R29vZ2xl/AVvXsEhezFlGUv283wMfFFRxOeUvfBfXtZYvDwQGYh0y-rFttM9sycfDSQQRHDpVhgGuVIDALIXkvIZPebbJdl5Eb89LIkF-4GKoQxNy9SCsdgL5-t-0ADgrSH7WbfrJVqFk-gNx-84S1K_CPyj2/?imgmax=800 "TipMeTuesdayButton1[1]")
![BFOLprojectbutton[1]](https://blogger.googleusercontent.com/img/b/R29vZ2xl/AVvXsEjb3GmbMq5cf_RnQ1oLqzrsc1A_BvAd9eZ8UmVpdeSB4gcR56dPz4-jK38Z1fMGdmbVlwiYgPfq_B6SFqbBhbdSIQwR6pn2y-1gFnAgp9XUEBK0r_0Vlq_CpgRjG0suQKnOj-mM-YKsiyMV/?imgmax=800 "BFOLprojectbutton[1]")
![features3[1]](https://blogger.googleusercontent.com/img/b/R29vZ2xl/AVvXsEhxNDpPbMCjLYbjbwcoca0pnBFWHIavv6O6UaGzIADM4vgptvTLsgRriQ7Gc_BHAuJwHP_S4tlYf0hy-fa55n10cM_7gbn044CIkSFSccNQxzCZ3kKLfHrbz05u4cYL6grLet0lE0iOfqHp/?imgmax=800 "features3[1]")
![fingerprintsonthefridge_button[1]](https://blogger.googleusercontent.com/img/b/R29vZ2xl/AVvXsEjExLFaZV9UzqNgrO0JL3CYMJmmVfuZXABG-1FnDJ23U4HVK6X-2lIxsfZPNRet9bYehsmigJIIQjWQEvSjNIDu8LEbILKBwhFUfOyLhPRTdzPYxIHdOz469iCKcy22CnwV23ePJFEGx3CD/?imgmax=800 "fingerprintsonthefridge_button[1]")
![2zsr4li[1]](https://blogger.googleusercontent.com/img/b/R29vZ2xl/AVvXsEgF3jLHeJHc3EcK2xsiWnDEvyLlhhL5FltrL5gnxb-wW2o2NuEsi2S0cQKF-PoGKYjWVJl56rz3fGwZ7QisD5R-lIjstMO211XGvftfd6YbB3Xag7iGV4xz6N186ubUCTdplLpqr01vjGnj/?imgmax=800 "2zsr4li[1]")
![wgw button[1]](https://blogger.googleusercontent.com/img/b/R29vZ2xl/AVvXsEgo9Lcnhhf0Sf-wGIncxsO04rzoU8P-7-kZHcuB1NcxrQC4jXzuHitoxghxgYJyphmjTIlFAq5H5LU5jiNv9MvqVUag3Dtral2EqLedRUz5tSCGVCbPjxMukIoirCaX9QP0t4Euu_CQQzx6/?imgmax=800 "wgw button[1]")
![button2[1]](https://blogger.googleusercontent.com/img/b/R29vZ2xl/AVvXsEj3LmPP-ewU_rZ7mmUESp9jYh8H8XqQvIpdH9rj-qOwJiW_9pBeUCTdyAXvj4wWNa-9sEI-0Z15rqFZ4o-4XozijrtCwOe_kaOKwugY3KbfKOR2MmjqKFxSA-kvBILexWwMukrHXfQaCVe8/?imgmax=800 "button2[1]")
![31-days-of-painted-projects-slideshow[1]](https://blogger.googleusercontent.com/img/b/R29vZ2xl/AVvXsEgZ8wpFjHcRfScERXgF9YO6hc-3-TCB7pyX0K-GxoNRPY7j7Y08j1-PETl38sUhjwejH4adF1QakvOARdSp2wKhd6lzjjJ4_f90e89vL7w9tf8NXc-5l6PmCMmPbSOXL9MmQ5LhWnbbgCW6/?imgmax=800 "31-days-of-painted-projects-slideshow[1]")


![DIYShowOffbuttonsmall[1]](https://blogger.googleusercontent.com/img/b/R29vZ2xl/AVvXsEjjMvpo0X6MBaL_Q0LUYVkgp8IxrMwI8otaTmoexSAi65_bXHpvPXSdyT3DvG1yGjhV-wHoP_x-16tQnWpoFfKNXXt6nM9Ylt4EcVQwh1so-_otAU7OYZG9zBMfqPHOjIKBWY-OkErGo_pO/?imgmax=800 "DIYShowOffbuttonsmall[1]")
![4[1]](https://blogger.googleusercontent.com/img/b/R29vZ2xl/AVvXsEiiFYg_f31hP2OzAYRkGa7TouNv3EgZbCxnf78QJf1lA9eSH5COSnjEe0yCKUyI2XWhPPxkdYqwn5Za4q1MIIQnGgPfNICa2CtqLVu7_VBVKfs8jT9DNz2VNzmX4VYF7aKRleXMwVh7nPWi/?imgmax=800 "4[1]")
![TipMeTuesdayButton1[1]](https://blogger.googleusercontent.com/img/b/R29vZ2xl/AVvXsEhgTBqJjvVdW6lhVOJbQX8qxxb4PQgh_KjvuI6Um3quNKoHiSsggO2p7Q40ctfsllXZQTFhAJJDTG4h8FmWZ0SdjqtfdQdPoYwo6UpQUZxHlTUlZ0bN3LVZbMl6R5vcjE0ynmqyc049PCnK/?imgmax=800 "TipMeTuesdayButton1[1]")
![BFOLprojectbutton[2]](https://blogger.googleusercontent.com/img/b/R29vZ2xl/AVvXsEjsbGZJGfWgmxb0bnnAt1Dt0bUM7YjlC7-EP4qQQ3HCc679z7vwF1EHwyq3B-LjfDgF21ss93zXGy4OVoxE5vfs3bCehfN5DnC9piXIhfUTfKlH85sQawawA0K9_X7d8yV9oaYGVJ1v-Pl0/?imgmax=800 "BFOLprojectbutton[2]")
![features3[2]](https://blogger.googleusercontent.com/img/b/R29vZ2xl/AVvXsEjXZ1M14rUfhQyEdk18Pb4Qz1SmCnv_c09AhxLhXlVD_ZtVHU7OBfcZErgzzaN4FNflzISz1PVnEYLg2DpD3zKWPjPv8nBpRzAk2X3icR9DljNMHf3LAkYcQs4IGiVszmqDRuik2op1-GxJ/?imgmax=800 "features3[2]")
![fingerprintsonthefridge_button[1]](https://blogger.googleusercontent.com/img/b/R29vZ2xl/AVvXsEiz417h2UM-vWqGjvZkYc16eY6RHiL327E3DzTDA5gMzG6Ax7O1cYSG6SsOUxz3C6LDGie9ZsTk6MBnkeLHteJg1Ji-b2IJbm_jfWidyPs2_ng0YYY-BxfJOtZra1fVuFMeR6pcB44MThtv/?imgmax=800 "fingerprintsonthefridge_button[1]")
![2zsr4li[1]](https://blogger.googleusercontent.com/img/b/R29vZ2xl/AVvXsEgCjIhFBRXGB53MK7oQzDWKxsRNd8u0OltmpiupBZn_gBNLzHmLBZ09V_6eHoJfvRmdrLODOr6OmQAoFmnNNEiBebjLK8UM0H-qjTrIYgY5xzV6jrm6NHf20DkGRjugRoYFf04Po511zUqR/?imgmax=800 "2zsr4li[1]")
![wgw button[2]](https://blogger.googleusercontent.com/img/b/R29vZ2xl/AVvXsEirSe6TGrHTjwl5MHBIzbdEL9XAE6Br753GyxsoEZ1E9g9_SF6krjj8kcMc89vvXo4aR6kPeTZUBQZxM2PH7PA4VnWceFzcIyyT_w9FMyHD7NBrYPs3aOoYps4qLNW2kkRDgKm4rnzw-DsD/?imgmax=800 "wgw button[2]")
![31-days-of-painted-projects-slideshow[3]](https://blogger.googleusercontent.com/img/b/R29vZ2xl/AVvXsEgX1svjXtcDXYcqMo1Iyf6R_O-hQniDvkAi5XuVTOgq9dzYX4dqxjKOvdahyphenhyphensWbgVp9VJVNhLXJS82XiNxH50xWWZzuSpTj-hwVTbQfmPieTFM_E1y9NEWwuKflodgxyKrr_h1VqitzxXBr/?imgmax=800 "31-days-of-painted-projects-slideshow[3]")


